Every visual interaction you have with your computer is governed by a single, critical setting: your screen resolution. Whether you are setting up a brand-new ultra-wide 4K monitor for video editing, connecting an external projector for a boardroom meeting, or simply trying to make the text on your aging laptop a bit more comfortable to read, mastering how to check and change your Windows screen resolution is absolutely essential. In this ultimate guide, we provide you with everything you need to know about navigating the display settings in Windows 10 and Windows 11, diagnosing common blurriness issues, and matching your graphics output perfectly to your hardware capabilities.
1. What Exactly Appears When You Change Screen Resolution?
Before diving into the "how-to," it is vital to understand the "what" and "why." The screen resolution of a monitor refers to the specific number of distinct pixels in each dimension that can be displayed. It is usually expressed as width × height, for example, 1920 × 1080 (commonly known as 1080p or Full HD) or 3840 × 2160 (known as 4K or Ultra HD).
When you alter the resolution in your Windows operating system, you are instructing the graphics card on how many pixels it should render. If you set the resolution lower than your monitor's native physical resolution (e.g., setting a 1080p monitor to output 1280 × 720), the physical pixels on your monitor must arbitrarily stretch the smaller input image to fill the screen. This process, known as interpolation, causes the famously blurry, "soft" look that so many users struggle to correct.
Conversely, selecting the "Native" resolution (the maximum amount of physical pixels built into your actual hardware) guarantees 1:1 pixel mapping. This results in the sharpest text, clearest images, and most accurate visual representations possible. Therefore, knowing your display’s native capability is the first step to visual perfection.
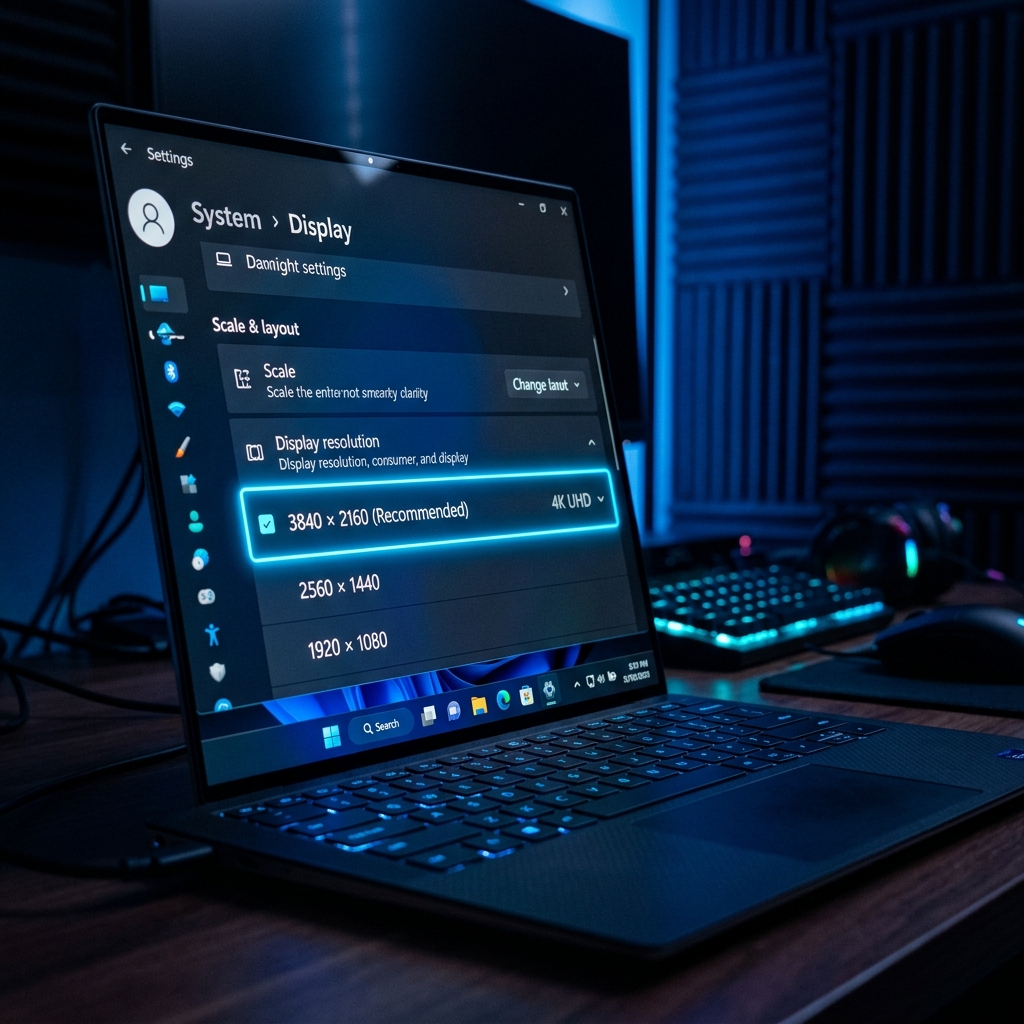
2. Step-by-Step: How to Check or Change Screen Resolution on Windows 11
Microsoft significantly redesigned the Settings app in Windows 11 to combine minimalism with advanced functionality. If your PC has automatically updated or came pre-installed with Windows 11, verifying your display metrics has never been easier. Follow these exact steps:
- Open the Display Settings Panel: Right-click anywhere on an empty space on your desktop. A sleek context menu will appear. Look for the option near the bottom labeled Display settings and click it. Depending on your configuration, you can also press the
Windows Key + Ito open the Settings App, then navigate toSystem > Display. - Identify the Correct Display: If you are working with a sophisticated multi-monitor setup, you will see blue numbered rectangles representing each screen at the top of the menu. Click the rectangle representing the specific monitor you wish to configure. If you are unsure which is which, click the Identify button; a massive number will flash momentarily on your physical screens.
- Locate the Scale & Layout Section: Scroll down the page until you find a section prominently marked Scale & layout. Within this group, you will see a drop-down menu explicitly titled Display resolution.
- Adjust the Resolution: Click the drop-down box. You will be presented with a list of mathematically supported resolutions. Windows is intelligent enough to analyze your EDID (Extended Display Identification Data) and append the word (Recommended) next to the resolution that perfectly matches your monitor's native hardware. For the absolute best clarity, click the (Recommended) option.
- Confirm Changes: Your screen will momentarily go completely black as the GPU synchronizes with the new pixel mapping. When the image returns, Windows will display a 15-second countdown timer asking, "Keep these display settings?" If the screen looks beautifully sharp, click Keep changes. If the screen artifacting occurs or it remains black, do not panic; simply wait 15 seconds, and Windows will automatically revert to your previous safe setting.
3. Step-by-Step: How to Check or Change Screen Resolution on Windows 10
While Windows 10 shares the same core architectural logic as its younger sibling, the graphical user interface handles the presentation slightly differently. For the hundreds of millions of users still reliably depending on Windows 10 for enterprise work and hardcore gaming, the methodology remains straightforward:
- Minimize all active applications so you can clearly see your desktop wallpaper.
- Perform a standard right-click on any blank area of the desktop, completely avoiding icons or shortcuts.
- Select Display settings from the traditional context menu that spawns.
- In the Settings window that opens, ensure you are scrolled down to the grouping labeled Scale and layout.
- Look for the Display resolution drop-down menu. Just as in Windows 11, you will see a list of aspect-ratio-complaint dimensions.
- Choose the option marked with the suffix (Recommended). The system will apply the state change.
- If the visuals meet your expectations, permanently apply the change by clicking Keep changes before the expiration timer runs out.
Advanced Notice for PC Enthusiasts
Sometimes, Windows fails to detect the maximum supported resolution of specialized hardware, such as ultra-wide panels or high-refresh-rate IPS displays. This is almost exclusively caused by missing or completely corrupted GPU drivers. If you know your shiny new monitor is 1440p, but the Windows drop-down stops at 1080p, you must immediately open your NVIDIA Control Panel, AMD Adrenalin software, or Intel Graphics Command Center to download the latest DCH ecosystem drivers.
4. Distinguishing Between Scaled DPI and Raw Pixel Count
A frequent area of monumental confusion for users is the interplay between the "Display resolution" dropdown and the "Scale" dropdown located just above it. Understanding this synergy is crucial.
Imagine purchasing an ultra-premium 14-inch laptop featuring a pristine 4K (3840 × 2160) panel. If Windows mapped everything at a sheer 1:1 pixel ratio, text documents would be functionally microscopic—essentially unreadable unless you pressed your face against the glass. To resolve this physics problem, Microsoft utilizes Display Scaling.
Display Scaling (often set to 150%, 200%, or even 300% on high-end laptops) artifically enlarges the user interface—the icons, the taskbar, the font rendering—while keeping the raw graphics output at the maximum native hardware resolution. Many users mistakenly attempt to fix "small text" by lowering their main Display Resolution. Never lower your Display Resolution to make things bigger! Lowering the resolution ruins the crystal clear native 1:1 pixel mapping and introduces massive blur. The correct, professional solution is to keep the Display Resolution firmly locked to the (Recommended) maximum value, and instead, independently increase the Scale percentage until the text sizes comfortably suit your visual preference.
5. What Does "Refresh Rate" Have to Do With It?
Resolution dictates how much detail is present on screen, but your Refresh Rate (measured in Hertz, or Hz) governs how smoothly that detail moves. Standard office monitors deliver images at a steady 60Hz. However, the gaming industry and premium corporate monitors have rapidly pushed boundaries toward 120Hz, 144Hz, and even 240Hz, meaning the screen updates its imagery up to 240 times per second.
Occasionally, an unoptimized DisplayPort or aging HDMI cable cannot handle the immense bandwidth required to push a high resolution alongside a high refresh rate simultaneously. If your display is aggressively flickering or completely cutting out to a black screen, try lowering the refresh rate via Advanced display settings located at the bottom of your primary display menu. Finding the perfect equilibrium between your resolution output, refresh rate capabilities, and cable bandwidth is the true mark of a hardware power user.
6. Taking Control: Summary and Next Steps
Adjusting your Windows screen resolution is a procedure every modern computer user must master. By ensuring you have correctly selected your monitor’s native (Recommended) hardware setting, you automatically prevent visual artifacting and eye strain. Remember to distinguish between the sheer density of your resolution and the magnification of your scaling factors.
With these comprehensive techniques firmly in your toolkit, your visual workspace—be it analyzing massive Excel spreadsheets, gaming in immersive 3D environments, or purely browsing the web—will finally utilize the full potential of the hardware you paid for.